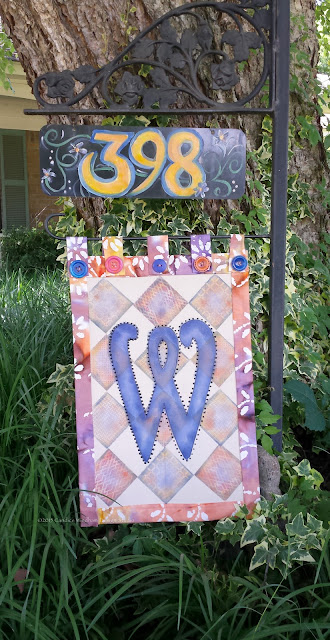
Summer Garden Flag
Welcome to another Designer Crafts Connection blog hop featuring Ann Butler's Background Basics Stamps and her line of Colorbox Crafter's Inks, all from Clearsnap.
I have had several of Ann's stamp designs, including my all-time favorite alphabet, and a selection of her bright ink colors for a couple of years, but when I received her newest stamps and colors, I developed a new-found appreciation for her products. Not only are the stamps red rubber on a firm foam cushion, but the ink pads are juicy, juicy, juicy. I think I'm in love!
I've been wanting custom garden flag for a long time, but never got around to making one. I have this beautiful mail box and address holder that my sweet friend Donna Lee gave us for Christmas a few years ago, but our driveway is long, and our mailbox is in my neighbor's yard across the street. I just painted our address on the placard and stuck it in my front flower bed, which is actually a sea of monkey grass. The sign had faded and was in need of updating.
I rejuvenated the whole thing and added my new flag, all with Ann's products and a little help from Beacon Fabri-Tak adhesive.
Here's how:
Supplies
Ann Butler's Background Basics Stamps, 3" (Colorbox)
Ann Butler's Crafter's Inks, Blueberry, Tangelo, Sunshine, Lilac and Canyon (Colorbox)
Canvas-type fabric, 13" x 20"
Fat Quarter, cut to 3" x 21" (two), 13" x 3" (two) and 6" x 3" (five) (Quick Cuts, available at Walmart)
Large Buttons, 5
Fabri-Tak Permanent Adhesive (Beacon)
Computer generated letter, 8" x 10"
Chipboard
Spray Adhesive (3M)
Permanent marker (Sharpie)
Pearl Pen, Black, Viva Décor)
Scissors, masking tape, ruler, iron, needle and thread, chalk pencil, sponges
Instructions
1. Mark the vertical center of the canvas with the chalk pencil.
2. Using Canyon and Blueberry inks and beginning in the center, stamp four 3" quilt square stamps down the center of the fabric, alternating colors and allowing the points to touch on the line.
Tip: Mark the horizontal center and place the tip of the first block at this point. Stamp the second right above it. Complete the last two stamps top and bottom and your stamps will be centered vertically and horizontally.
3. Stamp the horizontal rows lining up the corners.
Tip: Mark the horizontal lines after you have stamped the first vertical row if you are unsure about your placement.
4. Heat set the inks using an iron and pressing cloth or a heat tool.
5. Sponge the buttons with Tangelo and Blueberry inks and heat set. Set aside.
Tip: Remember to heat set your inks each time you add more.
6. Tape off the edges of the stamp blocks and sponge all blocks, beginning with Lilac ink in the center and Sunshine and Tangelo inks, on the edges, blending the colors a little. Use the edge of the sponge or a make-up applicator to lightly add Blueberry ink to the block edges. Remove the masking tape and heat set the inks.
7. Fold 3" x 21" and 13" x 3" to make 1 1/2" wide strips. Fold the edges under 1/4" on the long sides. Apply Fabri-Tak to the edges to hold them in place. Run a strip of adhesive along the fold on the short pieces and attach them to the top and bottom of the flag, pushing the flag edge right up to the fold. Apply Fabri-Tak to the front and back edges and adhere to the flag.
8. Turn under one end of the long strips 1/4" and adhere with Fabri-Tak. Apply Fabri-Tak to the center fold of each strip and, lining up the finished edge at the bottom of the flag, attach the strips to each side of the flag. Trim the top edge if necessary, fold it under 1/4" so it's flush with the top and adhere with Fabri-Tak.
9. Fold the edges all around on the five 3" x 6" strips and fold the sides in to make a 1 1/4" wide tab. Mark five equidistant spots along the top of the flag, apply Fabri-Tak and place one edge of the tabs about 1/8" from the bottom of the trim edge. Stitch the buttons in place, then fold the remaining tab edge to the back. Apply Fabri-Tak and adhere in place, making sure the folds are properly aligned.
10. Print out your letter on standard printer paper and adhere it to a piece of chipboard.
Tip: I wanted my letter fatter, but the font I wanted to use, Harrington, did not come in bold. I just drew an additional 1/4" around the letter before cutting it out.
11. Tape the letter down with masking tape.
12. Use a permanent marker to trace the letter onto the stamped fabric.
Tip: Be careful to keep your marker moving so that your fabric doesn't absorb too much ink.
12. Place masking tape along the edges to mask out the background.
13. Sponge Lilac ink onto the letter body, then use the edge of your sponge to blend Blueberry ink along the edges. Remove the tape and heat set the ink.
14. Apply black Pearl Pen dots 3/16" apart all around the letter.
My address placard, originally painted with pastel acrylic paint, had faded, so I sponged the inside of the numbers with Canyon, Sunshine and Tangelo, then used a flat brush with a little bit of water to add Blueberry ink around the edges.
Tip: If you need to weaken your ink intensity, either smoosh the pad onto a palette made from a piece of wax paper or barely touch your damp brush to the side edge of the pad to keep your colors intense for a long time.
I think we will enjoy this flag for a long time. I also look forward to creating more seasonal flags using Ann Butler's wonderful products!


Comments