Posts

Showing posts from 2015

Turkey Day Table Decor

Image
Autumn is here in all its glory. It's time for football games, burning leaves, harvest celebrations and Thanksgiving will soon be upon us. Now is the time to get your table decor ready, and this quick and easy project will get your crafty holiday juices flowing Here's how I did it: Supplies Reusable-Non Stick Craft Sheet ( KoolTak™ ) Premium Extreme Adhesive, 1/2" width ( KoolTak™ ) Foam Adhesive Foam Pads, Clear, 1/4" x 1/4" x 1/32" ( KoolTak™ ) Layer Plus Tool ( KoolTak™ ) Little B Chipboard Pack, one sheet for every two place card holders ( LittleBllc.com ) Patterned paper 1/2 sheet per place card holder (Paper Studio) Kraft Paper, 8 1/2" x 11",  one sheet per eight name tags and 1 sheet per four napkin rings Mulberry paper, gold, one sheet per five napkin rings Gold card stock, one sheet per eight name tags Makin's Air Dry Clay, Brown, one pack ( Makin's A

Duck Commander Man Cave Fan Pull

Image
I love the Duck Commander stamps from KellyCraft and, while my hubby does not have a man cave, I thought this little fan pull would be great for his office space. This tag is made from counter-top samples from the hardware store. Don't bother pretending to be looking for samples for your new kitchen; the hardware people usually have samples that are outdated and will happily to give them to you. If there is a stamped name on the tile front, just use a little Goof Off to remove it. Here's how I did it: Supplies KellyCraft Duck Commander Acrylic Stamps, Set #2 Acrylic Stamp Block Stazon Ink Pads, Black, Rusty Brown and Forest Green Small Swirl Stamp Tile Samples, two, the same size and shape Beacon 3-in-1 Adhesive Sponge Krylon Triple Thick Glaze Goof Off sticky residue remover, if needed Ball Chain  Awesome Spray Cleaner Instructions 1. Clean and remove any stamped writing from the tile fronts with Goof Off. 2. Sponge on green and brown inks randomly,

Happy Halloween Photo Frame

Image
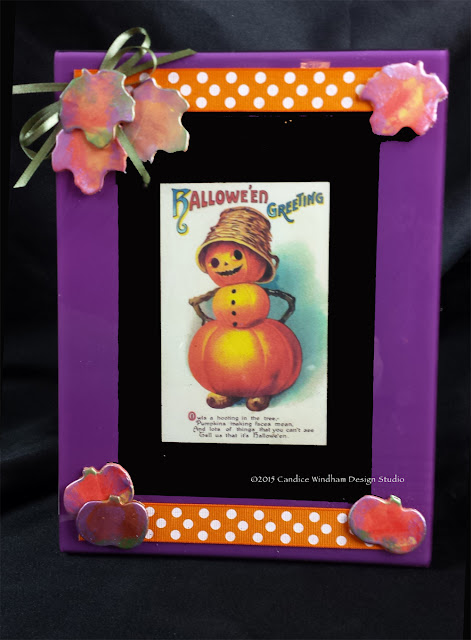
  Nothing says Autumn like vintage Halloween images, and this is one of my favorites. I recently attended the Bella Crafts Connections' craft retreat in Bloomington, MN and received a wonderful swag bag packed with new products and supplies. One of the inclusions was this sweet purple frame from Deflecto. I know it comes in a variety of colors, perfect for allowing you to express your creativity. I have used Deflecto products in the past to organize my workspace and have always admired the quality and variety or their products. Using this Deflecto frame makes the project easy, and once October is over, I can swap the image out for a vintage Thanksgiving image. I had a lot of fall embellishments left over from a Makin's No Bake Clay project, and they were perfect for accenting this frame to display a vintage Halloween greeting card. Here’s a tip that I used on this project: When you have bits and pieces of clay left from a

Vintage Photo Greeting Card

Image
  Recently, on a trip to my husband's family reunion in Morrilton, Arkansas, we spent an afternoon in the local antique district. We both love antique stores. He loves vintage musical instruments, and I love everything else. I ran across a huge box of old photos from WWI to the early '50s and knew they would be perfect for using with some stamp sets I have, the Jimbo Lojik line from KellyCraft. This blond had such a pretty expression on her face, but I had planned to use a sarcastic phrase from one of my Jimbo Lojik sets. When I actually got into it, I changed my mind at the last minute and went in a totally different direction. Please note: This is not a detrimental commentary on the "dumb blonde" characterization. This phrase would work with a photo of any brunette or redhead as well as with a male image.   Here's how I did it: Supplies • Get-it-Straight Laser Square and Multi-Mat (KellyCraft) • Jimbo Lojik Polymer Stamps, Set D (KellyCraft) • Maki

A Few of My Favorite Things...

Image
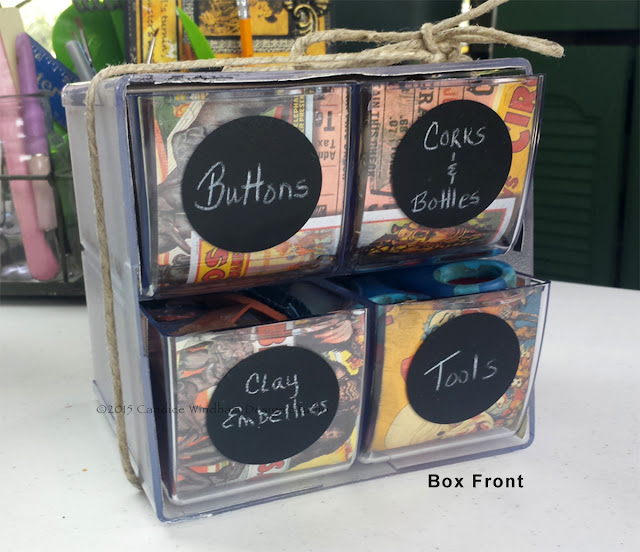
--> I have always loved bins, cubbies, anything to stash and organize small items. That’s why I adore this Deflecto four-drawer bin. It makes it so easy to corral all the little pieces that are essential to my wo rk. These four-drawer bins have an added advantage: You can clip on  more bin sets to increase your organization abilities, thereby adding more storage to your work station. I decided to use some papers that I have been hoarding for a while (because I love them and what they represent) to personalize the units. The rulers and letterpress letters remind me of my dad; the pen nibs remind me of my first calligraphy efforts; the accounting sheets, my mother’s job as a bookkeeper; the train memorabilia, the train tracks that ran near my grandmother’s house; and the game images, the happy hours my sister and I spent playing Bingo, Old Maid and Checkers. Just having this on my workspace brings back happy memories, also reminding me of why I love to create

Uncle Si Robertson Card

Image
When Duck Dynasty premiered, I swore I would never watch such a red neck production, but I watched it one time and was hooked. The family values expressed on this show are what America needs to be reminded of daily: love your family, trust in God and have a good time. The only thing better than KellyCraft's Get-it-Straight Laser Square and Multi-mat Docking Station  is a combination of KellyCraft's Duck Commander and Jimbo Logic stamps. When I finished it, it needed a little something extra, so I went through my stash of Makin's Air Dry Polymer Clay embellishments. When I have leftover small pieces of clay, I either cut them with a clay cutter or use them in a push-mold to create little pieces of art that I can use to finish out future projects. The color was a bright turquoise blue, but a coat of shiny black paint and a little Inka Gold took care of that. Here's how I made this Uncle Si Robertson card, with the lojik of KellyCraft co-founder Jimbo Kelly's

Toulouse Lautrec-Inspired Greeting Card

Image
I love the art of Toulouse Lautrec, Graphic 45 paper and Jimbo Lojik stamps, so when I saw this Graphic 45 paper, I knew I had to create something using KellyCraft's Jimbo Lojik stamps. I was showing my cousin how to make prints using Distress Inks, water and a protective mat, so this design came together very quickly. Here's how I did it. Supplies Jimbo Lojik Stamps (Set H) Graphic 45 8" x 8" paper slab (Typography) Black card stock, 8 1/2" x 6 1/2" folded to 6 1/2"  x 4 1/4" White card stock ,  8 1/2" x 5 1/2" Green card stock scrap Distress Inks, Black Soot, Spiced Marmalade, Mustard Seed, Broken China (Tim Holtz for Ranger, Inc.) Protective mat Water spritzer Crafter's Tape double-stick adhesive Black permanent marker (Sharpie) Instructions Pat Distress Inks directly onto protective mat. Spritz the colors with water and press the white card stock onto the inks. If you have any bare areas, just add more ink