Posts

Showing posts from February, 2010

A Blast from My Past

Image
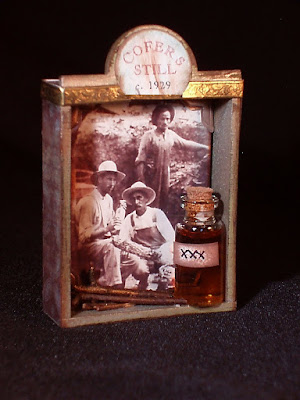
I just love this little shrine. The 3 1/2" tall base is new at RockCandy StudiosTM , and I wish I had more of them to create little family memories. This particular one is from the dark side of our family history. That photo includes two of my uncles with our family still in the background. That's right. This good Baptist girl came from a long line of moonshiners. Now you know my secret. The photo, which also includes two more men, one of which is my paternal grandfather, is on our Manly Men Collage Images CD (You get 120+ images, and all are scanned at 300 dpi so you can resize and print as many as you need for your projects.). I also used our Dresden Foil Leaf and Flower border and one of our corked glass bottles. The faux moonshine is sorghum molasses. I sealed the cork with Beacon Quick Grip so I wouldn't have to worry about it coming loose and having molasses everywhere. All wording was done on an inkjet printer and the XXX on the bottle was just hand lettered with a

Who says you can't mix metallic colors?

Image
I finished this little shelf shrine tonight and just had to post it. It's a mere 3 1/2" tall, but it has a lot of impact. I love these Dresden butterflies, and the tiny copper trim is the perfect size for finishing off the edges of this shrine. The shrine, one of our new structure pieces at RockCandy StudiosTM, is masonite, which has been laser-cut and scored for perfect hinges, and all of the embellishments (except the Prima flower, feather and brad) and trim are from RockCandy StudiosTM ( www.rockcandystudios.com ), but the paper is from Webster's Pages ( www.websterspages.ning.com ), which I recently discovered at Eclectica Scrapbooks and Stamps in Memphis, Tennessee. Webster's Pages' art is simply beautiful with lots of subtleties and quotes and it's all double sided. I used the "Grow, live honestly and creatively" quote from one of their line (can't tell you which one because I cut off the manufacturer's strip and chunked it before I went

A New Idea

Image
I'm back from the Craft and Hobby Association Tradeshow and want to share this little book that I had in my Designer Showcase. It's made from Eleen Hull's Sizzix Frame Scoreboard and this is how I made it: 1. Adhere paper to both sides of the mat board or chipboard using 3M Super 77 adhesive. Use a brayer to make sure you get good adhesion. Die cut the matboard using a Big Shot. 2. Fold the frame in place and adhere with heavy duty double stick tape. 3. Cut the frame with an Xacto knife at the point fold, sand the cut edges and sponge all around with ink that coordinates with your paper. 4. Add bookbinding tape on the spine, folding it to the inside top and bottom. 5. Add a strip of Dresden foil trim (www.rockcandystudios.com) along the bookbinding tape on front and back to cover the match point. 6. Cut 15 sheets of black cardstock 8" X 3 3/4". Fold to 4" X 3 3/4" . Make signatures of three sheets and tie each signature to book spine using heavy-duty emb