A Few of My Favorite Things...


I have always loved bins, cubbies, anything to stash and
organize small items. That’s why I adore this Deflecto four-drawer bin. It makes it so
easy to corral all the little pieces that are essential to my work.
These four-drawer bins have an added advantage: You can clip
on more bin sets to increase your
organization abilities, thereby adding more storage to your work
station.
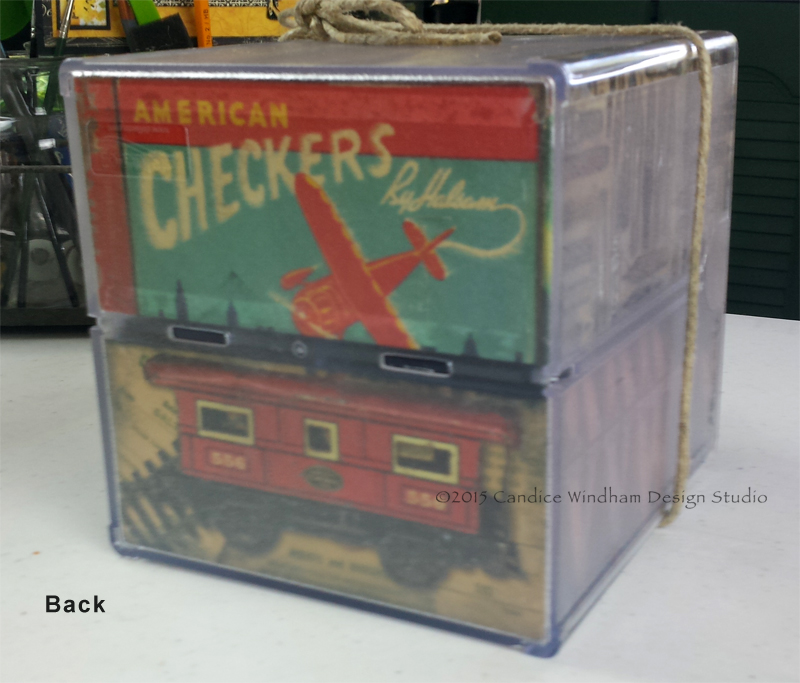
 I decided to use some papers that I have been hoarding for a
while (because I love them and what they represent) to personalize the units.
The rulers and letterpress letters remind me of my dad; the pen nibs remind me
of my first calligraphy efforts; the accounting sheets, my mother’s job as a
bookkeeper; the train memorabilia, the train tracks that ran near my
grandmother’s house; and the game images, the happy hours my sister and I spent
playing Bingo, Old Maid and Checkers. Just having this on my workspace brings
back happy memories, also reminding me of why I love to create because all
these people instilled this passion in my heart.
I decided to use some papers that I have been hoarding for a
while (because I love them and what they represent) to personalize the units.
The rulers and letterpress letters remind me of my dad; the pen nibs remind me
of my first calligraphy efforts; the accounting sheets, my mother’s job as a
bookkeeper; the train memorabilia, the train tracks that ran near my
grandmother’s house; and the game images, the happy hours my sister and I spent
playing Bingo, Old Maid and Checkers. Just having this on my workspace brings
back happy memories, also reminding me of why I love to create because all
these people instilled this passion in my heart. If you love Deflecto products the way I do, here's your chance to win! Go to the DCC Blog and see how you can win these great Deflecto products!
  Here’s how I made this project:
Supplies
• Deflecto Interlocking Stackable Organizer, 6”x 6” x 7 1/5”,
four drawers, #350301CR
• Cardstock, eight sheets (two of the same print, but the
others can vary), 9” x 9” (Tim Holtz Distressables, Ranger, Design Originals)
• Flat Glue Dots
• Double-stick tape, ¼” (Sookwang)
• Canning Jar Chalkboard Labels, 1 7/8” (Anchor Hocking)
• Clear self-adhesive shelf cover (Contact)
• White colored pencil (Prismacolor) or chalk
• Cord or ribbon, 36”
• Black ink (Stazon)
Instructions
Notes:
• Be sure to check
each piece of cardstock for fit before adding adhesive. You can use
double-stick tape on any surfaces that are frosted because the tape won’t be
detectable, but use glue dots on the front lining of the clear drawers.
• Sponge all cardstock edges with black ink prior to adding tape or glue dots.
Remove drawers and set aside. Cut cardstock for the box top
to 5 ¾” x 5 7/8”. Attach double-stick
tape to the top side of the cardstock at each edge and slip the cardstock into
the top of the bin. Press flat along edges to adhere.
Cut four different cardstock patterns, 5 7/8” x 2 5/8”.
Attach double-stick tape to the top side of the paper at each edge and slip the
cardstock into the side sections of the bin. Press flat along edges to adhere.

Cut two additional cardstock patterns, 5 7/8” x 2 3/4”.
Attach double-stick tape to the top side of the paper at each edge and slip the
cardstock into the back sections of the bin. Press flat along edges to adhere.
Drawers: Place clear self-adhesive shelf cover on the back of the two identical sheets of cardstock and trim.

Cut four
pieces of cardstock, 2 ½” x 8 ½”, from these two cardstock sheets.

Attach
Glue Dots to the top of the cardstock at the two front corners and double-stick
tape about 5” from the opposite end.

Slip the cardstock into the bottom of each
bin with the top of the paper showing in the front on the bin and the shelf
cover side to the top inside the bin to protect the surface from dirt. Press
flat along edges to adhere.

Tip: Cut larger flat glue dots in half to save a little
money without losing the adhesive power.
Attach the chalk paper circles to the front of each bin and
write the contents with chalk or a light colored pencil. Tie the cord around
the box for added interest.

This piece can be used in just about any room in your home
to hold a variety of small items, but I will use it for holding small craft
supplies, especially those that I forget that I have when they are hidden away: clay embellishments leftover from previous projects, buttons, small corked bottles, and small scissors and tools.
Place it on your workspace and enjoy not only the
organization, but also the memories invoked by the nostalgic theme!


Comments
Thanks from G'ma Nancy
sapps2luv (at) yahoo (dot) com