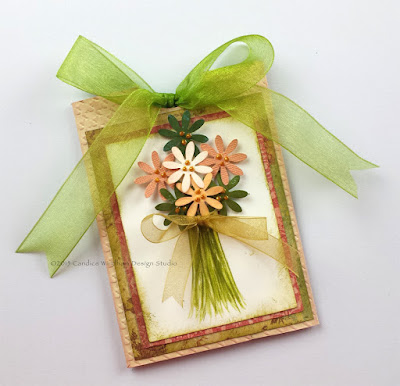
Celebrate Summer Pocket Card
-->
Note: This is the front of the card. The added papers will cover the seams.
Sponge the edges of the printed papers with Distress Inks and attach them to the card front with 1/4” Kool Tak™ Ultra Clear Adhesive.
On the cream card stock, mark the center of the card about 1 1/2″ from the top, then mark a spot 3/8″ om either side and punch two holes with the Cropadile.
Summer’s here, and what better way to
celebrate than with this sweet little surprise for your favorite gardener? This
is a wonderful little happy to cheer someone up, tuck into a gift bag or offer
an extra-special thank you, and this little pocket card is not only pretty, it
contains a nice surprise.
You can make this in 30 minutes or less
so it’s a pleasure to give. Make several at one time to have on hand when you
need a special little something at the last minute.
Here’s how:
Supplies
- Kool Tak™ Dimensional Foam Squares, 1/4” x 1/4” x 1/8″
- Kool Tak™ Ultra Clear Adhesive, 1/4”
- Card stock, textured , 8 1/2” x 11” (Graphic 45 Coordinations), and cream, 3” x 4” (Stampin’Up®)
- Patterned paper or card stock scraps, 3 5/8” x 4 5/8” and 3 3/8” x 4 3/8”
- Colored pencil, green (Prismacolor)
- Ribbon, gold, 1/2” x 8” and green, 1/2” x 28”
- Flower Punch
- Circle Punch, 1”
- Cropadile or long reach hole punch, 1/8”
- Distress Ink, Peeled Paint and Tattered Rose (Tim Holtz for Ranger)
- Pearl Pen (Viva Décor)
- Flower seed packets
- Tools: Scissors, paper cutter with scoring blade, small flat paint brush, sponges
Instructions
Apply 1/4” Kool Tak™ Ultra Clear
Adhesive vertically along 2 1/2”side flap and horizontally along bottom flap.
Fold the bottom flap up and remove the
release paper. Fold the 2” flap toward the center and adhere it to the bottom
flap.
Fold
the 2 1/2” flap toward the center, remove the release paper and adhere it to
the right and bottom flaps.
Note: This is the front of the card. The added papers will cover the seams.
Punch a half circle at the center top
opening. Sponge the edges with Tattered Rose Distress Ink.
Sponge the edges of the printed papers with Distress Inks and attach them to the card front with 1/4” Kool Tak™ Ultra Clear Adhesive.
On the cream card stock, mark the center of the card about 1 1/2″ from the top, then mark a spot 3/8″ om either side and punch two holes with the Cropadile.
Draw flower stems with the flat brush,
dipping it onto the green stamp pad and brushing down from about 1 1/2″ from the top of the
cream card stock. Blend more color into the stems with the green colored
pencil.
Punch
two holes on either side of the stems, just below the 1 1/2″
mark and thread the gold ribbon through from back to front. Tie the ribbon in a
bow across the drawn stems.
Punch the flowers from the card stock
scraps, sponge the edges with Distress inks and adhere the flowers to the cream
card stock at the top of the stems with 1/4” Kool Tak™ Dimensional Foam Squares.
Tip:
If your card stock scraps are not quite the shade you want, just press them
into the ink pads to make the colors blend with the overall appearance of the
card.
Use the Pearl Pen to add centers to the
flowers.
Wrap the green ribbon around the seed
packets, top to bottom, and tie a bow at the top. Slip it inside the pocket
with the bow showing at the half-circle cutout.
That’s it. Quick and easy-peasy. You’ll
want to make several of these to have on hand when you need a sweet little
something to tuck in a gift bag or just to give on it’s own. Your friends will
remember you all summer long when they see the beautiful addition you gave them
for their garden.
Tip:
Change up the color scheme and slip cocoa, popcorn or tea bags in a Glassine
envelope in the pocket for seasonal gifts.


Comments