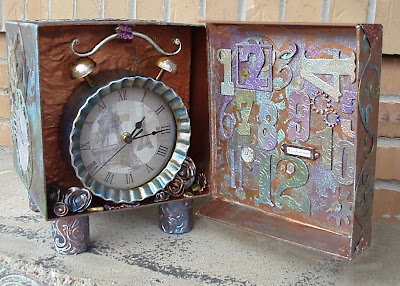
Steampunk, Southern Style
 |
| Open box to show clock (display mode). |
 |
| Box top, back and side detail |
This is my version of Steampunk, Southern Style. The copper base paint gives a little bit of an industrial looks, but the blue, green, rose and lavender colors make it soft like an early June morning when you can smell honeysuckle and hear birds chirping. Oh, I do love the South!
Be sure to click on the DCC button on the left to hop to other blogs and see their wonderful creations. You'll be glad you did!
Supplies
Paper maché box with lid, 8" cube (Hobby Lobby)
3D Stamping Paint, Mint, Metallic Blue, Rose (Viva Décor)
Inka Gold, Light Blue, Violet, Lime Green, Rose, Copper, Cobalt Blue (Viva Décor)
Round sponge dauber (Viva Décor)
Sponge brushes
Sophisticated Finishes, Copper
Gadget Gears die cuts from chipboard (Tim Holtz Alterations/Sizzix)
Swirls die cuts from chipboard (Sizzix)
Weathered Clock die cuts from chipboard (Tim Holtz Alterations/Sizzix)
Beacon 3-in-1 Adhesive
Alarm clock, no taller than 7" (Big Lots)
Makin's Air Dry Clay (white)
Paper towel center roll, cut into 4 2.5" pieces
Grunge Board numbers, 1-12 (Tim Holtz/Ranger)
Foam floral block cut to fit the width of the box and approx. 4" deep
Chipboard, 8" x 8"
Kraft Paper, 10" x 10" and 4 scraps, 4" x 4" (Packing material works great for this!)
Flat found objects (book plates, watch faces,washers, etc.)
Metal strip, 2" x 1/2", textured with a Sizzix Texture Plate
Chestnut Roan ink (Colorbox/Clearsnap)
Big Shot and Texture Plates
Lightweight silver metal, such as aluminum flashing or Walnut Hollow Aluminum
Directions
1. Cover box surfaces, inside and out, with copper paint. Apply all colors of Inka Gold to all box surfaces, blending all the colors as you go.
2. Paint all the die cuts and Grunge Board with 3D Stamping Paint, using an up-and-down motion with the sponge dauber to create texture. When dry, rub Inka Gold on the edges of some of the pieces to set them apart. Sponge all edges with Chestnut Roan ink.
 |
| Lid attachment on side of box. |
4. When all surfaces are dry, begin arranging the diecuts and flat found objects and gluing them down.
5. On the lid inside, arrange Grunge Board numbers and fill in blank spots with flat found objects.
6. Adhere the foam block inside the box. Cover the 8" chipboard with Kraft Paper that has been wrinkled and smoothed out and paint it with copper paint. Rub Chestnut Roan ink over the surface if you want the wrinkles to stand out. Adhere the chipboard to the foam block. This creates a stop so that your clock doesn't go all the way to the back of the box.
 |
| Box lid detail |
Tip: You can hold the clock in place with a piece of Scotch Poster Tape, which will allow you to remove the clock without damage to either the clock or chipboard surface.
Tip: Remember that you need to be able to remove the clock to reset time or change the battery. You will probably have to re-attach the metal strip each time you want to remove the clock.
8. Make roses and leaves using Makin's Clay. When dry, paint with copper paint, rub with Inka Gold and adhere them around the base of the clock .
9. Texturize metal pieces, approx. 4" x 4", and adhere to the paper towel rolls, turning the metal inside the rolls to finish the edges. Apply Inka Gold (Cobalt Blue) to each piece and adhere to box bottom.
 |
| Inside lid detail. |
10. Carefully slit the edges of the box top on the side that will be opened. Glue the loose box edge to the box side. Hold in place with push pins until it dries thoroughly.
You can add embellishments from here to Sunday if you like. Just be sure you put a dab of Inka Gold or 3D Stamping Paint to make it blend with the rest of this project.
There you have it. An easy-peasy Southern Steampunk clock to proudly display. Usually when I have completed a project, I look back and always see something I would change about it. This is an exception. I love this one just the way it is.
Note: I received product from Viva Décor, Beacon Adhesives and Makin's Clay.


Comments