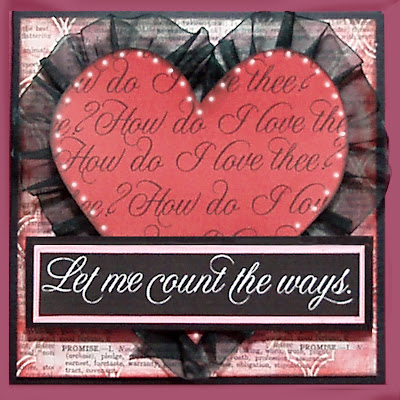
How do I love thee?
Since it's February 1, it's time for some valentine magic!
This card was created using the Duetica Lettering Arts Studio software and Viva Décor Pearl Pens. Duetica makes custom type so easy to create and there are hundreds of variations. I used the DT-Mandolyn font, which is my favorite, mostly because I can add beautiful swirls to the letters and make them wrap around themselves. You could set this up on your computer and leave it as is, printed in black, white and red and it would be fine, but let's add some layers and bling it up a little to take it to the next level!
After I thought I was finished with my card, I left this on my work table for a while and then realized it needed some Ice White Pearl Pen. That made all the difference in the world.
Here's how I did it:
Supplies
Duetica Lettering Arts Studio
Adobe Illustrator Software- Optional (See Step 3, Part B below if you don’t have a drawing program.)
White card stock
Black cardstock, 12” x 6” (folded to 6” x 6”)and scrap 3” x 6”
Pink Paislee (mist)•a •bles Card Stock, 5 ¾”x 5 ¾”
Colorbox Pigment Inks: Rose, Black, Scarlet
Viva Décor Pearl Pen, Ice White
Glue Dots
Kool Tac Premium Extreme double side tape, ¼” wide
Offray 1 ¼” Black Organdy Ribbon, 24”
Directions
1. Set type using the DT-Mandolyn font. Adjust ascenders and descenders to your taste.
2. Select an option:
Part A for Adobe Illustrator: Draw a heart approximately 5” wide and tall. Fill with red. Place the How do I love thee? type on the heart shape by repeatedly pasting and offsetting the copy in Illustrator and print onto white cardstock. Print Let me count the ways (reverse the type out of black) on the same sheet. Cut out heart and sponge edges with black ink.
Part B, using a Word Document: Repeat the phrase in a 6” tall and 6” block of continuous type in a Word document. Print out on red cardstock. Cut the heart shape with scissors. Print Let me count the ways (reverse the type out of black) on white card. Sponge edges of heart with black ink.
4. Apply Premium Extreme tape along the back edge of the heart. Place the organdy ribbon on the tape and create ruffles all around.
To create ruffle: Place ½” of the beginning edge of the ribbon on the tape with approximately 1” extending outside the edge. Fold the ribbon back onto the 1/4'” of glued ribbon and press down to attach another half-inch. Repeat until you have covered the entire edge.
5. Cover (mist)• a•bles card lightly with Rose ink. Rub with a paper towel or soft cloth to reveal the embossed pattern on the cardstock. Repeat on edges with Scarlet ink, then finish off with black ink on the edges.
6. Apply large glue dots to the back of the heart and adhere to the (mist)• a•bles card stock.
Note: You may have to stack two glue dots to accommodate your ruffled ribbon.
7. Trim Let me count the ways and layer on pink then black cardstock. Attach with large glue dots.
8 . Use Pearl Pen to apply pearl dots around edge on heart. Once dry, layer entire card onto 6” black folded square.
Note: While I received product from Viva Décor, Duetica Lettering Arts Studio, Clearsnap/Colorbox and Kool Tac, I would never recommend a product I didn't use regularly or believe in. I never settle for second best unless I just can't afford it, but I use the best possible products in my price range for my project.


Comments
it will be famous, due to its feature contents.
My web page - click here
no doubt very quickly it will be famous, due to its feature
contents.
Look into my webpage click here
My website > know more
on building up new weblog.
My web-site :: click here
reading through your blog posts. Can you recommend any other blogs/websites/forums that cover the same topics?
Appreciate it!
my website know more
My web site > website
Also visit my web site ... website