Ta-dah!

CraftyKT is sponsoring a Kool Tak Manufacturer Challenge, the Fabulously Fall Blog Hop. Kool Tak has some wonderful products (I especially love the Super Tacky Tape!). I also received the Layer Perfect tool, Kool Tak Shiny Transfer Foil Sheets, Clear Foam Tape and Clear Adhesive Foam pads.
We have a blog hop going. Yep, that's right. Just click on the Designer Craft Connection button at left to hop forward or backward and see some other projects made with these great tools by eleven more CHA designers.
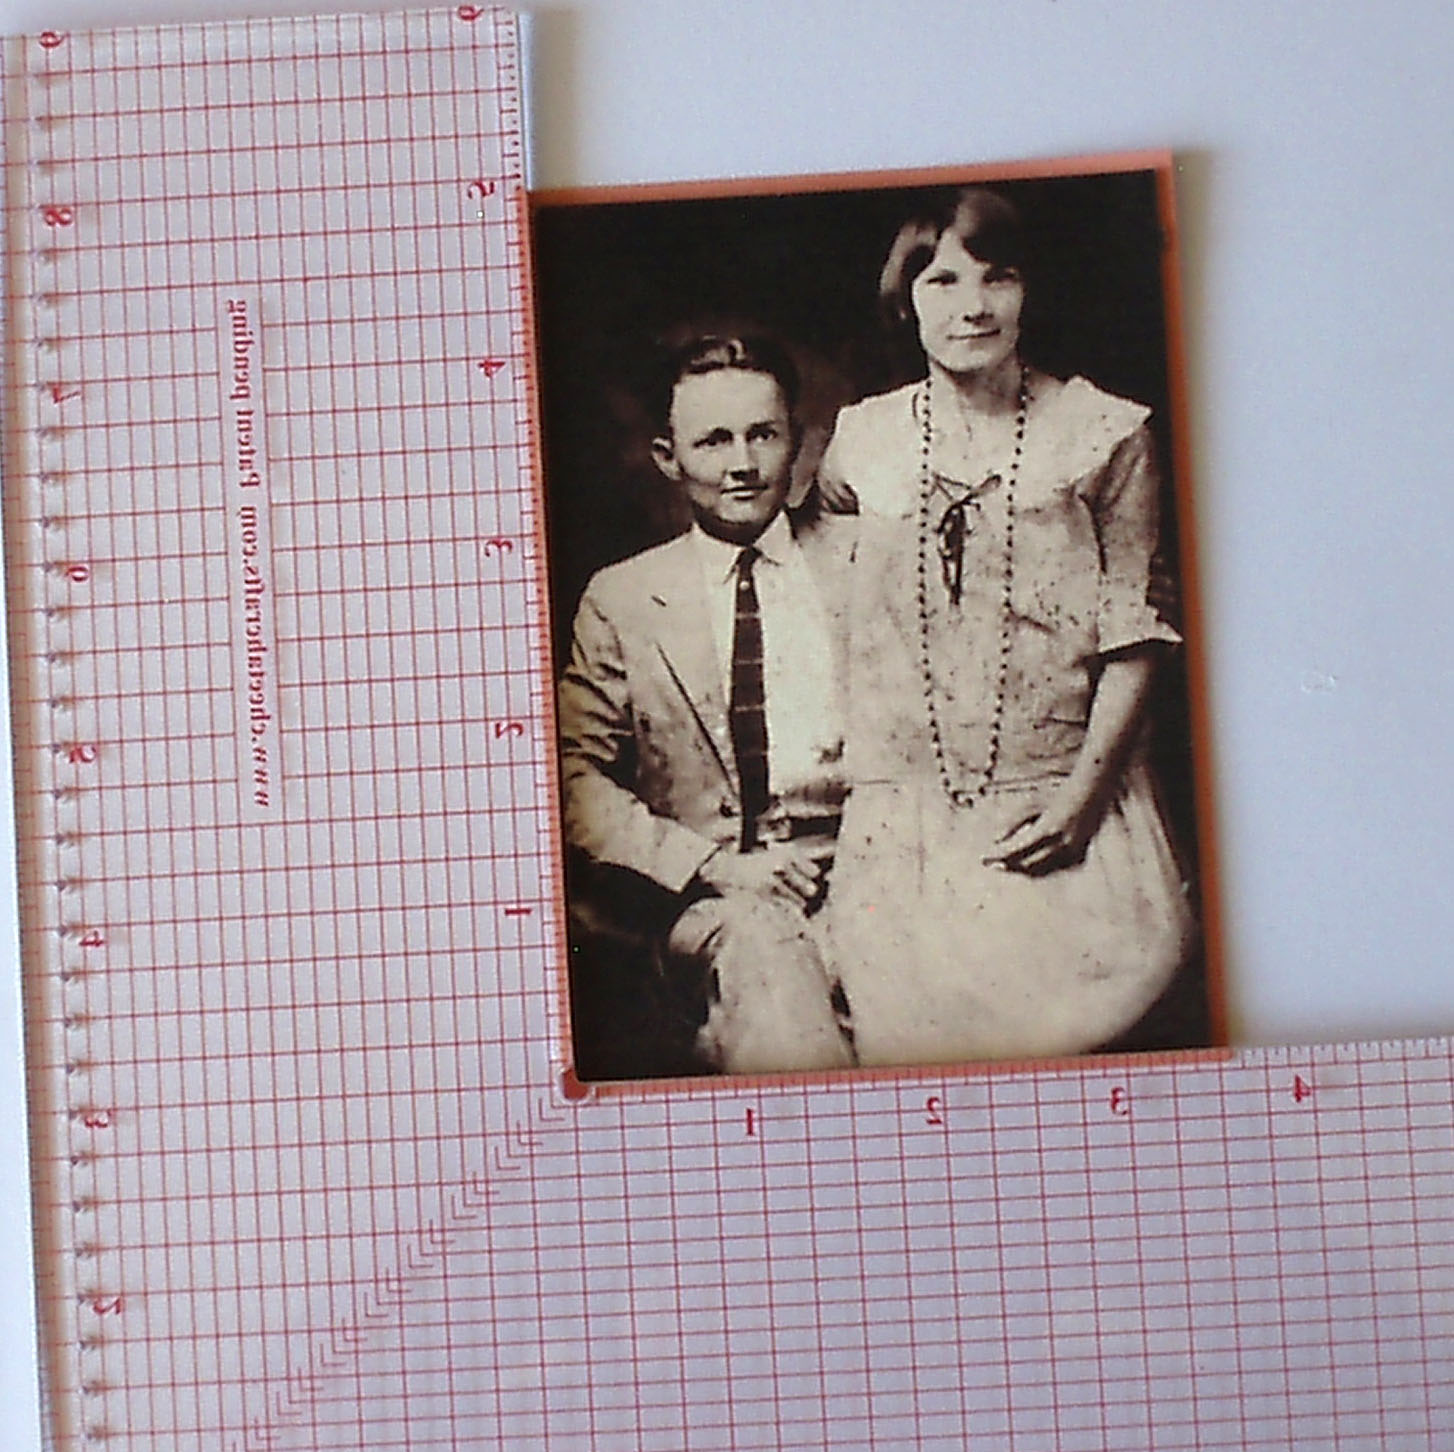
I had lots of ideas for my first post on this subject, but decided to start with a nice simple scrapbook page about Jim and Mildred Wilson, my maternal grandparents. I took a little artistic license with the Fall theme, but after all, brown, orange, peach and black are fall colors.
What's that? What do you mean there's no journaling? Of course there is. I tucked it into a pocket on the back because I just had too much to say about this wonderful couple. It leaves my layout nice and clean but still holds information about their wonderful love story. — and doesn't show off my chicken-scratch (as my granny would say) handwriting.
Here's how I did it:
 |
| 1. I started with these three layers. The photo is approximately 4 1/2" x 5 1/2", the peach layer 4 3/4" x 5 3/4" and the brown layer 5 1/8" x 6 1/8". All edges were sponged with Colorbox Chestnut Roan Chalk Ink. |
 |
| 2. I wanted a tiny border of the peach cardstock, so just one unit on the Layer Perfect tool was perfect. It's so easy to line up the corners and lines and get perfectly straight layers. (I usually don't notice that they are crooked until after they are glued down good and tight. This tool and the Kellycraft Get-It-Straight Laser Square eliminate that!) From the website: "Made from recyclable acrylic with 2 steel cutting edges, evenly spaced
holes for piercing, a grid background, thoughtfully printed in pink or
green ensuring whatever colour card stock you are using, you will always
achieve perfect matting and layering." I used Kool Tak Clear Foam Adhesive Squares to give the photo a little lift. |
 |
| 3. Adding the third layer is a snap! |
 |
| 4. Once the third layer was aligned, I used this fabulously strong Super Tacky Tape to adhere it. |
 | ||||||||
| 5. This great paper from DCWV's Timeless Type Stack is perfect. I used my Westcott Craft knife to cut out the right side of the rose, leaves and buds. Note: The flowers, leaves, buds and some additional swirls are clear embossed so you can apply ink to the entire image, then wipe off the excess ink to make the embossed images stand out. I also used Colorbox Chestnut Roan Chalk Ink to sponge all the cutout edges to hide that bright white. |
 | ||||||||||||||||||||||
|
6. I wanted a larger margin on the 8" x 8" layer,
so my measurement is 3/8" on each side. I added the rose paper and only
applied the Super Tacky Tape to the edges, leaving the center loose so that I
could slide the photo in under the flowers. I used the Super Tacky Tape to adhere it.

At this point, I used Colorbox Chestnut Roan Chalk ink on all the flowers, cut edges and page edges, then wiped the flowers with a paper towel to remove excess ink and highlight the flowers.
I know this has been a long post, but I wanted to go into detail to show how easy it is to create beautiful projects using these wonderful tools.
And now for the best part:
Make sure to ENTER the The Kool Tak™ GIVEAWAY HERE,
which is valued
just under $70.
Kool Tak™ 1
Layer Perfect (Use it for centering, piercing, and edge stitching) Tool
Kool Tak™ 1
Shiny Transfer Foil Sheets (Earth Tones)
Kool Tak™ Clear
Foam tape ¼ x ¼ x 1/32” thick
Kool Tak™ Clear
Foam tape 3/16 x 1/16 thick by 1.6 yards
Kool Tak™
Premium EXTREME 2 ½ x 27 yards
*Only those with a mainland USA shipping address
are eligible to win
the giveaway.

Be sure to enter to win, then go out and enjoy this fabulous September Saturday with someone you love!
|


Comments