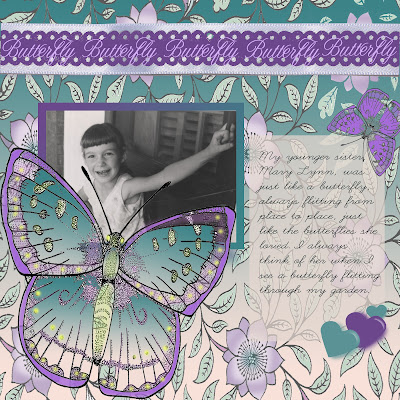
Flutter by, Little Butterfly
My sister was the closest human to a butterfly that I ever
saw. She was on the move constantly, bouncing from one room to the next in the
house or from sand box to swing to playing with the dog outside.
When I saw Duetica’s new Summertime kit, I knew exactly what
I wanted to create. I selected
only four pieces (it comes with at least 25 elements, which you can customize
to your liking) from the kit plus the Mandolin font to get the look. The
Duetica lettering system makes it so easy to customize your fonts and now, with
the digital kits, the sky is the limit.
Supplies
Duetica’s Summertime kit
Duetica Lettering
Arts Studio’s Mandolyn Font
Photoshop or other graphics drawing program
Computer
Directions
1. Open the Flower Pattern1 paper in Photoshop. Add/change
colors by selecting the background and using the gradient tool to create the
base. Select each flower and enhance the colors. Repeat with the leaves.
2. Open the butterfly in a separate file. Add colors to the
image.
3. Open the purple ribbon in a separate file. Make any
adjustments desired. (I made the ribbon a little more level.)
4. Place the
photo of your choice on the floral background. Draw a rectangle around the
photo, then apply the gradient tool. Bring the photo forward if necessary.
5. Place the large butterfly and adjust the size to your
liking.
6. Draw a rectangle for journaling and fill with 30% of your
lightest color. The percentage can be increased or decreased to your taste. I
wanted the background to show through. Compose your journaling inside the box.
7. Open the buttons file. Copy and paste the heart button
into a new file. Select the entire image and color it one color from your basic
palette. Open a second file and paste the heart button. Select and make this
one another color from you basic palette. Save as button blue, then reduce the
size and save as blue button small. Place all three onto the page.
8. You can either reduce the size of the butterfly file if
you want the same colors as step 2, or drop in a new one in black and white and
then add your choice of colors.
9. Open the Duetica Lettering Arts Studio and set the word
“Butterfly”. Save the file as a png,
then open that file in Photoshop. Select the letters and make each the
color you desire from you basic palette.
Place it on top of the ribbon, sizing it to fit. Repeat as necessary.
This project came together very quickly. I actually think it
took longer to write these instructions!
Can you tell I love Duetica’s products? They are so easy to
work with and the results are show-stopping every time. Plus, I know I’m
getting a custom look for my lettering that no one else will have.
Now go to www.duetica.com
and check them out. You’ll be glad you did!
I received product from Deutica Lettering Arts Studio.


Comments