Posts

Showing posts from December, 2008

To all my friends....

I want to let you know how much your friendship means to me. I know I don't post as often as I should, although I'm getting better. (Of course, when my previous track record was once a year, it's pretty easy to make an improvement!) For 2009, I wish you all a year of prosperity, love and lots of creative endeavors. May you have all the stamps and supplies you desire, all the time to make art that you need and the joy of like-minded individuals in your corner. Happy new year!
More from Artistic Outpost

Image
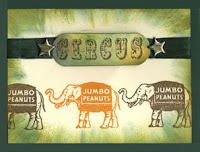
I just love these elephants! This card was so easy. Stamps from AO's Circus plate, inks are Ranger Tim Holtz Distress inks and cardstock is from Stampin'Up!®. 1. Stamp elephant across white cardstock with Spiced Marmalade and Walnut Stain inks. Sponge Shabby Shutters, Faded Jeans and Mustard Seed inks around edges. 2. Wrap and adhere dark green rayon ribbon (www.rockcandystudios.com) around card. 3. Sponge white cardstock with same inks as edges. Stamp circus with Walnut Stain ink. Trim and round corners. Edge with Krylon Gold Leafing pen. Mount label to cardfront with pop dots and add gold star brads (These brads were navy blue, so I painted them with the leafing pen as well). 4. Mount all to green cardstock. Check out all three new plates as well as specials from Artistic Outpost at www.artisticoutpost.com. You'll be glad you did! Have a fun week. It's almost Christmas! WhooHoo!

What a great party!

Image
Our River City Stampers Christmas party was held yesterday at Michelle Murphy's 135-year-old home in Arlington, Tennessee. The house was beautifully decorated, and Michelle and daughter Stephanie were the perfect hostesses. We had lots of good food, a great Dirty Santa swap and Secret Stamper pals were revealed. Today, Larry and I are about to put up our Christmas tree so we'll have time to enjoy it before we take it down! He's watching some sort of sporting event, so I'm taking a break to post. This is another Artistic Outpost card from the Fortune Teller plate. Here's how to make it: Inks: Ranger Tim Holtz Distress inks Cardstock and patterned paper: Stampin'Up!® 1. Stamp the fortune teller image on a sage green patterned paper. Use an Aqua Painter to add Mustard Seed and Spiced Marmalade inks to the background. Add violet and sage green to the fortune teller image. Layer onto More Mustard Cardstock. 2. Run a piece of Vintage Violet cardstock through a Cuttleb

Another New Sample from Artistic Outpost

Image
This card is from the Artistic Outpost Fortune Teller Plate. Cardstock is Stampin'Up!® and inks are Tim Holtz Distress Inks. The patterned paper is a ledger-style paper from my scrap box. Here's how to make the card.: 1. Sponge white cs with Spiced Marmalade, Shabby Shutters and Mustard Seed inks. Stamp the background stamp with Black Soot and attach to card base. 2. Stamp the hand image with Shabby Shutters ink on a scrap of patterned paper. Sponge edges in Shabby Shutters and Aged Mahogany. Layer onto green scrap and attach slightly off-center to card front. 3. Stamp magic in Aged Mahogany and sponge edges as above. Layer onto scrap and set aside. 4. Cut a scrap of patterned paper 3" X 5.5" and tear and sponge long edges. Wrap around left side of card. Tie ribbon and attach magic tag under knot. After a week of one of the worst colds I've ever had, I'm off to the River City Stampers Christmas Party this morning to hang with my stamping friends, eat yummy foo
Image
I just love this little Cutie Pie from the new Valentine plate from Artistic Outpost. These images are sooooo 1950s. They remind me of the style of the Valentine cards I shared with my friends. All inks are Tim Holtz Distress Inks and all cardstock and embossing powders are from StampinUp!® 1. I started with Whisper White cardstock and stamped the heart image randomly with embossing ink. I then added white embossing powder and heated. I then applied Lipstick Ink with a sponge over the entire background. I also stamped the image again on a separate piece of cs and applied red embossing powder. I trimmed the red heart closely. 2. I stamped the majorette image on white cs with Black Soot ink and colored with an aqua pen and several ink colors (Fired Brick, Lipstick and Aged Mahogany). I applied Krylon Gold Leafing pen to the fringe on the shoulders and added the dog tag. I trimmed it out and mounted it to the background with pop dots. 3. I trimmed a small piece of red cardstock and attach

New Plates from Artistic Outpost

Image
This is my favorite card made with the new Vintage Circus plate from Artistic Outpost(www.artisticoutpost.com). This is a new release, along with Fortune Teller and Valentine. I love all the new Artistic Outpost plates and will be posting a new image daily for the next couple of weeks. Here's brief description of the Vintage Circus plate from the AO website: Vintage Circus: Everyday is a circus in the Artistic Outpost studios. All we are missing are the wild animals and the three rings. This collection features vintage images from circus posters and advertisements from the 1900's. For our card makers, the main circus collage measures 3.75" x 5", a large stamp perfect for creating backgrounds. The entire collection comes in either an 8.5" x 5.5" unmounted sheet of red rubber OR mounted on EZMount cling foam, trimmed closely, and "mounted" onto a clear plastic printed index sheet. FREE shipping for USA orders of $50 or more. Here's how I made