Posts

Showing posts from May, 2015

Celebrate Summer Pocket Card

Image
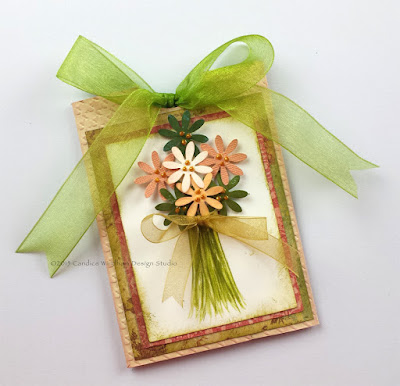
--> Summer’s here, and what better way to celebrate than with this sweet little surprise for your favorite gardener? This is a wonderful little happy to cheer someone up, tuck into a gift bag or offer an extra-special thank you, and this little pocket card is not only pretty, it contains a nice surprise. You can make this in 30 minutes or less so it’s a pleasure to give. Make several at one time to have on hand when you need a special little something at the last minute. Here’s how: Supplies Kool Tak™ Dimensional Foam Squares, 1/4” x 1/4” x 1/8 ″ Kool Tak™ Ultra Clear Adhesive, 1/4” Card stock, textured , 8 1/2” x 11” (Graphic 45 Coordinations), and cream, 3” x  4” (Stampin’Up®) Patterned paper or card stock scraps, 3 5/8” x 4 5/8” and 3 3/8” x 4 3/8” Colored pencil, green (Prismacolor) Ribbon, gold, 1/2” x 8” and green, 1/2” x 28” Flower Punch Circle Punch, 1” Cropadile or long reach hole punch, 1/8” Distress Ink, Peeled Paint and Tattered Rose

Proud to Be an American

Image
I love the latest stamps from KellyCraft featuring the Robertson family of Duck Dynasty fame. They are such characters, so typical of southerners. One thing I really love about this family is their love of our country, so I decided to make this card featuring Willie Robertson using some of my Makin's Air Dry Clay star embellishments that I made with bits and pieces of leftover clay from another project. As a matter of fact, all the pieces in this card are from leftovers. Pieces of paper and card stock that were too big to throw away have been inked to blend with my burgundy, navy and beige color scheme. The jute is left from a long-ago project that I don't even remember. The phrase stamp is a retired stamp from Stampin'Up!® that I have always loved. Here's how I made it: Supplies KellyCraft Jimbo Lojik Acrylic Stamps (Duck Commander Clear Polymer, Set 1) Mason Jar die (Eileen Hull for Sizzix)  Makin's White Air Dry Clay Makin's Clay Star Cutter,

Personalized Doggie Bandana

Image
I would do anything for my sweet sixteen-year-old Sam, the Wonder Lab, so when I had the opportunity to work with Joy iron-on letters , I knew exactly what I wanted to do. Sam lets me dress him up in jackets when it rains or is cold and bandanas the rest of the time, but he has never had his own personalized clothing before. Here’s how I made it: Supplies Joy Embroidered Iron-on Letters, 1 ½” Cooper Style Letters, white KellyCraft Get-It-Straight Laser Square and Multi-Mat Bandana (Hobby Lobby) Pearl Pen, white (Viva Décor) Iron Pressing Cloth Instructions 1. Press the bandana. Fold it into a triangle, then fold the sides in so that it fits on the Kellycraft Multi-Mat. Turn on the laser light and line up the letters.   2. Remove the release paper on each letter and stick the letters down. 3. Remove the bandana from the Kellycraft Multi-Mat and place it on your ironing surface. Cover the letters with a pressing cloth. Set the iron on the cotton s